How to Choose a Snowboard
Picking a board is a big decision—here’s how to do it right.
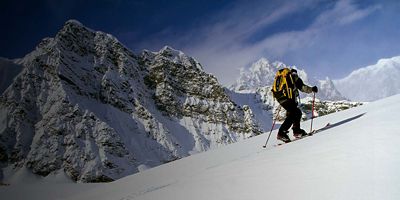
Every year, more skiers are discovering the best part of winter: alpine touring. Using specialized gear to explore the backcountry—hiking up and skiing down—opens a whole new world. What to expect? Terrain and scenery you won’t find in any resort. Unmatched solitude. Untouched powder. The afterglow of a great workout. Fun—lots and lots of fun. No debate: Alpine touring is one of the best ways to expand the number of days you spend in the mountains, but it comes with a learning curve, so start with this guide to the fundamentals.
The big difference in alpine touring (AT) gear over alpine (resort) gear is weight. When a chairlift is doing all the work, you can afford to have heavier gear. But when you’re walking uphill, you want a kit that balances low weight with performance.
Technically, you can mount an AT binding to just about any ski. And depending on your skiing goals and budget, some skis can do double duty as both resort and AT skis. But most backcountry skiers end up wanting skis that are made for the job, often designed with lighter wood core materials or carbon. Beyond weight, pick skis that suit the conditions you expect and type of skier you are. Prefer mellow glades over steep chutes? Seeking powder above all? Will ski in any snow? Get the lightest skis that match.
Alpine touring bindings are a key innovation in the evolution of backcountry skiing. Unlike telemark bindings, which only secure your toe, AT bindings let you lock your boot in place, so you can ski downhill just like you do at a resort. But when it’s time to travel uphill you can unlock your heel, allowing you to pivot at your toes and walk more normally. There are many different options; some prioritize low weight while others are more like slimmed down versions of resort bindings.
If you’ve ever taken a few steps in conventional ski boots, you know they’re too stiff for comfortable walking. AT boots have a release on the cuff that allows you to flex your ankle, making it possible to walk with a normal stride. They’re also typically lighter than alpine boots and not quite as stiff.
Skins are pieces of fabric that attach to the bottom of your skis (with tacky glue). You put them on to “skin” uphill and take them off to descend. They let you slide smoothly in one direction (forward) but grab the snow in the other direction, allowing you to climb uphill without sliding back down.
A helmet should be standard-issue for inbound skiing as well, but in the backcountry, the threat of trees, rocks, thin snow, avalanches, or other hazards makes one crucial.
You can use just about any ski pole, but lightweight, collapsible poles are best.
With backcountry skiing, you need to understand the risks and be prepared. There’s no ski patrol, no grooming, no boundaries, no avalanche control. You need to learn about the risks and be prepared for them. The biggest hazard is avalanches, and an avalanche beacon, probe, and shovel are mandatory (nice to have: a radio to communicate with other group members in an emergency). You’ll learn how to use avy gear when you take an avalanche safety course (see below).
Alpine touring unlocks endless terrain. The only limit is your time and learning curve.
For beginners, the best place to start is actually at the resort. Most mountains allow alpine touring on certain trails and/or at certain times of day. Practicing in a controlled, patrolled, and groomed environment is the best way to get comfortable moving with AT gear, and to familiarize yourself with the things you need and don’t need before heading into the backcountry. Check the rules at your local mountain to make sure they allow uphill travel.
Once you have the basics down, it’s time to head into the backcountry, which means any terrain outside of the resort boundaries. You might hear people talk about “sidecountry” or “slackcountry,” referring to areas just outside of resorts. But those names are misleading, as unpatrolled and uncontrolled terrain has the same risks anywhere, whether it’s one mile or 100 miles from a resort. It’s best to call it all backcountry and treat it all the same.
The best way to dip your toes into the backcountry is with an experienced friend or professional guide. (This is mandatory if you haven’t had avy training.) They’ll be able to show you where to go, how to find good snow, and explain the nuances of backcountry travel and skiing. On top of skiing itself and learning to use and manage your complicated new gear, a day of backcountry skiing includes lots of mountain navigation, group management, and good judgement. Again, it’s vital to understand that if you haven’t already taken an avalanche safety course from professionals (see below), you should never venture into the backcountry without someone who has—you could be skiing in avalanche-prone terrain without even knowing it.
With backcountry skiing, the more efficient you are, the more energy you’ll have and the more skiing you can do. Master efficiency with skinning and transitions with these tips—then practice, practice, practice.
Skinning is simply the movement of walking on flats and uphills with your skins attached to your skis. On moderate terrain, it’s pretty easy, but you still want to focus on efficiency. For example, don’t lift your ski off the snow; slide your ski forward on each step. On steep terrain, it gets trickier. Take shorter steps, stand up straight, and keep your weight on your heels. The more you skin, the more terrain you’ll experience, and the more efficient you’ll get.
The transition is the point where you switch from going uphill to downhill, or vice versa. At the top of your hike, it involves removing your skins, locking down your boots and bindings, putting on layers, and getting ready to descend. At the bottom, it involves releasing your boots and bindings and putting your skins back on, as well as removing layers and getting ready to climb again. Unless you’re in a skimo competition, transitions don’t need to be a race, but the shorter and more efficient you make them, the less time you’ll need to stand around getting cold (and the happier your partners will be with you). The first step toward efficiency: Know where everything is and where everything goes, and be prepared with water and snacks.
There’s no substitute for an avalanche course taught by professional instructors. If you’re headed into the backcountry, take a course or go with someone who has. In the U.S., a progression of courses forms the standard for avalanche education. You’ll learn how to identify avalanche terrain and assess risk, how to read and interpret avalanche forecasts, and what to do if you or someone else is caught in an avalanche. Find a course near you: avalanche.org.
All articles are for general informational purposes. Each individual’s needs, preferences, goals and abilities may vary. Be sure to obtain all appropriate training, expert supervision and/or medical advice before engaging in strenuous or potentially hazardous activity.