A lead climber belays a lower climber on a rockface

How To Lower a Stuck Rock Climbing Partner

Photo:Esalienko

Climbing self-rescue is all about being able to extract yourself from sticky situations, and often, the fastest way out is down.

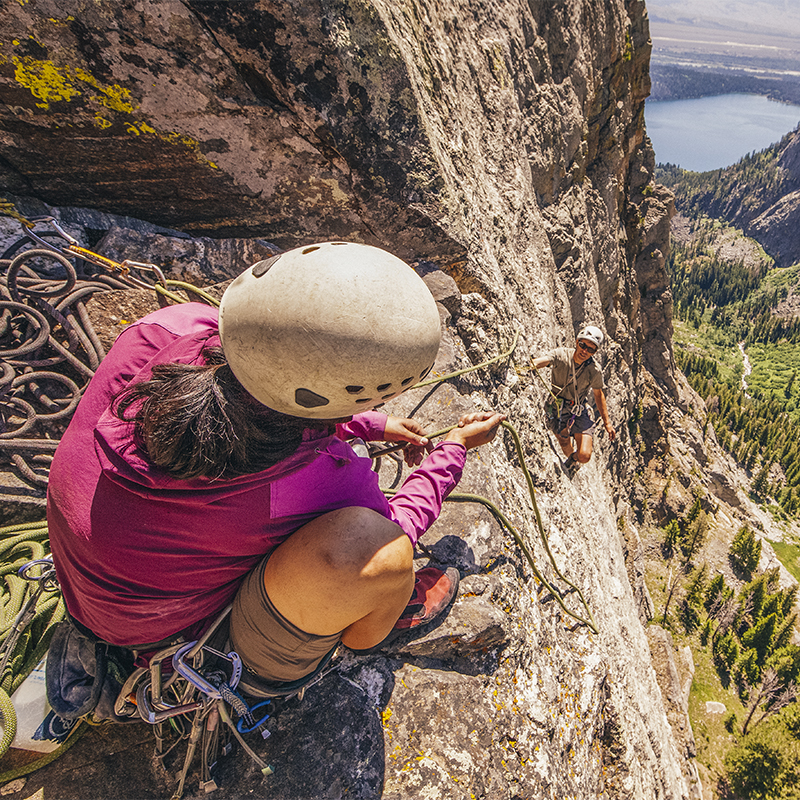
But if you’re already up, rigged on a multi-pitch anchor that you’re belaying your climbing partner up to, lowering them isn’t always simple. That’s because assisted-braking devices—like a GriGri or a tube-style device used in guide mode—are designed to lock to the rope, preventing a lower. Disengaging a device in this orientation could cause you to drop your partner.

Because lowering a partner is a common emergency fix—and one with plenty of room for error—it’s one of the best self-rescue skills to have dialed. Here are some common scenarios you might run into:

1. Your partner becomes injured while following you up a multi-pitch climb, and you need to lower them from above. 

2. Your follower has fallen and needs to be lowered to the last ledge so they can get back onto the rock. 

3. Bad weather starts rolling in and you realize the fastest way to get down is to lower your climber and then rappel after them.  

Necessary Equipment and Skills

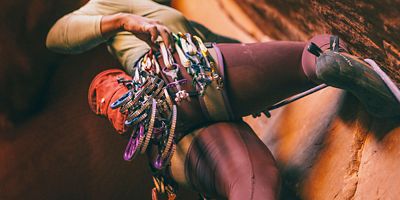
Fortunately, setting up a lower usually doesn’t take long, and you likely carry all the necessary equipment on your harness already. Here’s what you’ll need to get through the following scenarios.

Essential Gear

  • Tube-style belay device with guide mode (or an assisted-braking device like a GriGri)
  • 2 locking carabiners
  • 1 Hollow Block, Prusik loop, or other material to tie a friction hitch
  • 1 20-foot section of cordelette tied in a loop with a double-fisherman’s knot

Basic Skills

  • Use a tube-style device in guide mode
  • Transfer a load
  • Tie an overhand knot
  • Tie a Prusik hitch or autoblock hitch
  • Tie Münter hitch  
  • Tie a mule hitch
  • Tie a klemheist hitch

How To Lower After a Belay Escape

If you “escaped the belay” to rappel down and check on your follower, your anchor is already set up to lower. Simply follow these steps:  

1. Back it up with a friction-hitch. 

Add an autoblock or a Prusik knot to your brake strand as a safety backup and clip the hitch to your belay loop with a blocking carabiner. Make sure the hitch is engaged and grabbing the rope. 

2. Remove the klemheist.

Untie the friction hitch from your climber’s strand if that’s still in place. 

3. Remove the mule overhand. 

Grip the brake strand and carefully untie the mule overhand knot that’s keeping your Münter hitch locked in place. Lightly squeeze your friction-hitch backup to disengage it as you lower your climber. 

A lead climber belays a lower climber on a rockface Photo: Louis Arevalo/Tandemstock

How To Lower Your Follower with a GriGri 

If you were belaying your follower up to your anchor with a GriGri, the steps for lowering are pretty simple. 

1. Tie a safety knot. 

Anytime you need to go hands-free, tie off your belay device: Grab the brake strand just behind your assisted-braking device and tie an overhand knot on a bight. This is your safety backup.

2. Check for obstructions.

To safely lower from above with a GriGri, you’ll need to make sure the device is hanging freely from your masterpoint—if it presses up against the wall during the lower, your cam could become stuck in an open or closed orientation.

3. Redirect the brake strand.

If you crank open the lever of your GriGri, the rope will shoot straight through the device. To ensure a slow, controlled lower, first redirect the brake strand to keep it in the braking plane: Clip a carabiner beside your belay carabiner, on the side of the device opposite the lever. Redirect the rope through this carabiner such that the brake strand stays curled up and over the metal rail of the device, even when you pull down on it.

4. Lower your climber.

Keeping one hand on the brake strand at all times, pull up on the lever of the device to disengage the cam just enough that the rope begins to slide through. Lower the climber gently to the ground.

Lower a Follower in Guide Mode 

If you’ve spent much time belaying followers up multi-pitch climbs, you may be familiar with the one drawback of using a tube-style device in guide-mode: It’s a huge pain to lower. Fortunately you can get your device into a lowering orientation with a little load-transfer action.

1. Go hands-free

Tie an autoblock or Prusik just below your rappel device as a backup. Clip this to your belay loop with a locking carabiner, and make sure the hitch is grabbing the rope and holding it in place.

2. Tie a safety knot.

Once you’re hands-free, grab the brake strand about five feet back from your belay device. Tie an overhand on a bight here and clip it to the masterpoint of your anchor with a locking carabiner.  

3. Friction-hitch the cordelette to the climber’s strand.

Now grab your cordelette. Use one end to tie a klemheist hitch to the climber’s strand of the rope. (A Prusik hitch will also work—it will just take longer to tie and untie.)

4. Tie off your cordelette at the anchor.

When your friction hitch is tied, clip a locking carabiner to the masterpoint of your anchor. Tie the other end of the cordelette to that carabiner with a Münter hitch. Be sure to lock the carabiner. Tug at the strand behind the Münter to pull your cordelette good and taut, and tie the Münter in place with a mule-overhand.

5. Transfer the load. 

Grab the carabiner that’s locked in your belay device—the one running through both strands of rope and the device’s wire loop. Wiggle it back and forth to ratchet rope through the device, slowly lowering the climber’s weight onto the klemheist hitch.

6. Flip your belay device. 

When the load is transferred, you’ll have slack through your belay device. Unlock the carabiner running through the two strands of rope and the device’s wire loop but don’t take it out. Clip this carabiner to your masterpoint and lock it. Now unlock your second belay carabiner—the one in the ear of the device. Unclip this one from the ear and leave it on the masterpoint. Your belay device should be left hanging in a lowering orientation.

7. Redirect the brake strand.

You should now have a spare locking carabiner hanging from the masterpoint adjacent to your belay device. Clip the brake strand through this carabiner so that it curls up and back from the device, even when you pull down on it. This will keep the brake strand in the braking plane and help you maintain a slow and controlled lower. (Remember to lock this carabiner.)  

8. Remove your initial friction hitch. 

Check that your belay device is properly loaded, your belay carabiner is locked, and your backup hitch is still in place on the brake strand behind the device. You may now untie the mule overhand in your cordelette. Use the Münter to lower the climber’s weight onto the belay device until your cordelette falls slack. You can now untie your klemheist and stash the cordelette back on your harness.

9. Lower your climber. 

Without letting go of the brake strand, unclip your original safety knot from the masterpoint and untie the overhand knot. Then lightly squeeze the friction-hitch backup to disengage it and lower your climber.

Note: Performing these techniques incorrectly can be extremely dangerous. Always practice technical rope skills supervised by a professional in a safe environment before attempting them off the ground. No article about such skills should be considered a substitute for instruction from a qualified guide or instructor.

All articles are for general informational purposes.  Each individual’s needs, preferences, goals and abilities may vary.  Be sure to obtain all appropriate training, expert supervision and/or medical advice before engaging in strenuous or potentially hazardous activity.

MORE STORIES