Ice Climbing 101

Photo: Andrew Peacock/Tandemstock

Ice climbing doesn’t have to be an extreme sport. Here’s how to do it safely.

Ice climbing is one of the most surreal ways to experience winter. Picture this: The tree branches are heavy with fresh-fallen snow. Around you, chandeliers of ice hang in glassy curtains. As the sun comes over the ridge, they glimmer, and the dense blue ice at the core of the frozen waterfall before you almost seems to glow. Your breath plumes the air as you start up, the silence broken by the thunk of steel picks finding their mark. You settle into a tempo. Kick, kick. Swing. Kick, kick. Swing. The climbing becomes almost meditative. It’s a rhythm. It’s a heartbeat. It’s just you, the ice, and the gray winter sky.

Sound serene? It is! Intimidating? It doesn’t have to be. Ice climbing comes with plenty of inherent dangers, but many of these risks are easily managed in a top-rope setting, and the basic techniques are surprisingly simple. Unlike in rock climbing, ice routes are rarely overhung, there are holds wherever you want them, and you’ll never have to grip anything smaller than the handle of an ice tool. And thanks to the growing popularity of ice climbing across the U.S., there are more opportunities to learn how to ice climb than ever before.

Here’s what you need to know to get started:

  • Where to learn to ice climb
  • Essential gear
  • What about the screaming barfies?
  • Basic techniques

Where To Learn to Ice Climb

Signing up for a professional clinic or guided outing is the best way to learn how to ice ice climb in a safe environment. One of the most affordable ways to get out for your first time? Attend one of the handful of ice climbing festivals that occur throughout the U.S. in the winter. Most of these festivals offer free or heavily discounted gear rentals, a multitude of clinics to choose from, and tons of ice-climbing related films, speakers, games, and other festivities. Here are some of the better known fests:

  • Michigan Ice Fest, MI
  • Bozeman Ice Festival, MT  
  • Ouray Ice Festival, CO
  • Lake City Ice Climbing Festival, CO
  • Valdez Ice Climbing Festival, AK
  • Mount Washington Valley Ice Festival, NH

Essential Gear

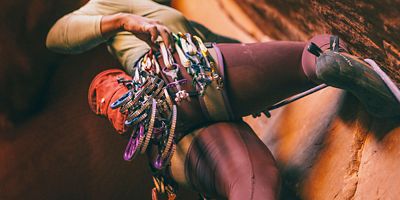
Ice climbing is a gear-intensive sport, but it’s easy to rent good stuff, find discounted items, or purchase second-hand if you look hard enough. Here are the must-haves. 

Mountaineering Boots: Stiff-soled boots with “welts” that allow them to take crampons and plenty of insulation. Some are only rated for three-season use, so check before you buy to make sure they’re adequate for the conditions you expect to encounter. Fit is paramount, so if you’re going to blow a paycheck on one piece of gear, make it your boots.

Crampons: Underfoot spikes that grip snow and ice. For ice climbing, you’ll need steel dual-point crampons that are compatible with your mountaineering boots.

Ice Tools: Similar to ice axes but with a curved shaft for easier swinging. If you’re buying second-hand, look for ice-specific picks that are sharp and in good condition.

Gloves: The more, the merrier. Most ice climbers have at least one pair of medium-weight gloves that are dexterous enough to climb in, and a separate pair of heavyweight belay gloves.

Shells: Waterproof jacket and pants; part of a smart layering strategy. Softshell outer layers are often sufficient for cold weather and dry climates, but in temps above 30 degrees F, you’ll want to break out the hardshells.

Helmet: A must-have for deflecting falling ice. Make sure your helmet is warm (no need for all those ventilation holes) and sized to wear a hat underneath.

Tube-Style Belay Device: An ATC, Reverso, or similar. Assisted-braking devices like GriGris don’t work on frozen ropes.

Dry-treated Rope: A 60-meter or 70-meter climbing rope with a special waterproof treatment. Dry treatments keep ropes from getting waterlogged, which can help prevent freezing.

Leashes or Ice Clippers: The former is a double-pronged leash that attaches your ice tools to your harness in case of drops; the latter is a pair of plastic carabiners that you affix to the sides of your harness. Both are optional but nice-to-have items for tool security and storage.

What About the Screaming Barfies?

If you’ve heard of ice climbing you may have also heard of the screaming barfies. This is the surprisingly accurate name for a common phenomenon in ice climbing that even scientists don’t fully understand. Basically, your hands get so cold they go numb, and when the blood starts to return, you feel waves of heat and nausea that make you feel like throwing up and yelling all at once.

The good news? A case of the screaming barfies usually only lasts a few minutes, and if you get it pretty good at the start of your climbing day, you’re unlikely to get it a second time unless you take a really long break or have circulation issues.

While the barfies are hard to prevent entirely on very cold days, you can forestall them by vigilantly shaking every time your hands start to feel numb while climbing, wearing properly sized gloves, and keeping your core warm.   

Basic Techniques

Unlike rock climbing, ice climbing doesn’t require a ton of upper body power or finger strength. Instead, you’ll rely on your legs, swinging technique, and movement efficiency.

Swinging Technique

With proper technique, you’ll be able to sink your pick into the ice on your first try, saving you tons of energy on the climb.

1. Find your mark. Pick a spot in the ice that you want to swing into. It should be high above your head (when you've stuck it, you should have only a slight bend in your elbow). Aim for divots and concavities.

2. Line up your elbow. Raise your elbow to shoulder height like you’re rearing back to give someone the perfect high-five.

3. Swing in line with your shoulder. Hinging at the elbow, swing the tool backward, keeping your elbow, shoulder, and wrist in the same plane. 

4. Flick the wrist. As you swing the tool toward the ice, follow through with our wrist, flicking it forward to drive the pick home.

5. Let the tool do the work. Good swings are about finesse, not strength. Keep a light grip, and focus on accuracy and follow-through rather than muscular power.

Kicking Technique

Good, strong kicks are the oft-overlooked basis of good ice climbing technique.

1. Kick, don’t step. It can be tempting to tiptoe up small shelves and scoops in the ice, but this can throw off your balance and result in a fall. Kick instead.

2. Hinge at the knee. Find the spot you want to kick into (concavities or clean, vertical patches of ice are usually best). Line up your knee above the spot and swing your lower leg backward.

3. Kick up. Flex your foot so that you’re kicking directly perpendicular to the ice or slightly upward. Kick hard.

4. Try, try again. You may need to kick several times to get a good stick, especially if there’s a layer of loose or hollow ice to clear away. Be patient.

5. Drop your heels. Once your front points are firmly buried in the ice, drop your heels. This allows the secondary points of your crampons to engage.

The Iron Triangle

The “Iron Triangle” or “Triangle method,” is likely the first technique you’ll learn and the one you’ll use most often.  

1. Swing high. Work one tool loose from the ice. Swing high until you’ve got a good stick directly above your head or just in line with your shoulder.

2. Sit back. When both tools are securely in the ice, sink down until your arms are hanging straight and your hips are back from the wall in a squat

3. Kick wide. Kick one foot up and wide, then the other. You should end up with both feet parallel, spaced wider than shoulder-width apart, and squared up beneath your higher tool. (That high tool and your feet should form an isosceles triangle, hence the name of the method.)

4. Stand up. Once you have two solid foot placements, stand up hard, squeezing your glutes and pressing your hips to the ice. Now pry your lower tool out of the ice and swing it high. 

5. Repeat. When you’ve got a solid tool placement, hang back on straight arms, and repeat Steps 2-5.

Note: Ice climbing is dangerous. Falling ice and/or rock is common, especially during thawing cycles. Always go with a certified guide for your first outing and don’t attempt to lead until you’ve mastered ice assessment, good technique, and the intricacies of ice protection and anchor building. Finally, remember that no written article is a substitute for in-person instruction from a qualified professional. 

All articles are for general informational purposes.  Each individual’s needs, preferences, goals and abilities may vary.  Be sure to obtain all appropriate training, expert supervision and/or medical advice before engaging in strenuous or potentially hazardous activity.

MORE STORIES