Cyclist Riding the Mountain Bike on Rocky Trail at Sunset.

Bike Suspension 101

How to set up and service your bike’s front and rear suspension.

Bike suspension, especially on the front only, is sometimes just a way to add comfort and relieve fatigue on your commute or your pleasure cruise. It’s a simple and inexpensive way to focus that relief on your wrists and shoulders. Other times, suspension is a way to maintain control and traction while riding off-road. That’s why some mountain bikes offer both front and rear suspension, allowing riders to float through rough terrain faster and more safely. But other mountain bikes opt only for front suspension to save cost, weight, or unwanted bouncing while pedaling. Whichever configuration your bike has, you’ll have a better ride if you understand how to set up and care for your suspension. 

Suspension Simplified

Adjustable suspension comes in many forms, but once you orient yourself to the relevant parts and key terms, you can do all of it yourself.

  • Entry-level front suspension often simply uses a metal spring inside one or both of the fork legs. On top of the fork legs there may be a thumb screw to increase the spring force or preload. This adjustment usually maxes out at three or four full turns, where exceptionally light or heavy riders might not find the perfect setting.
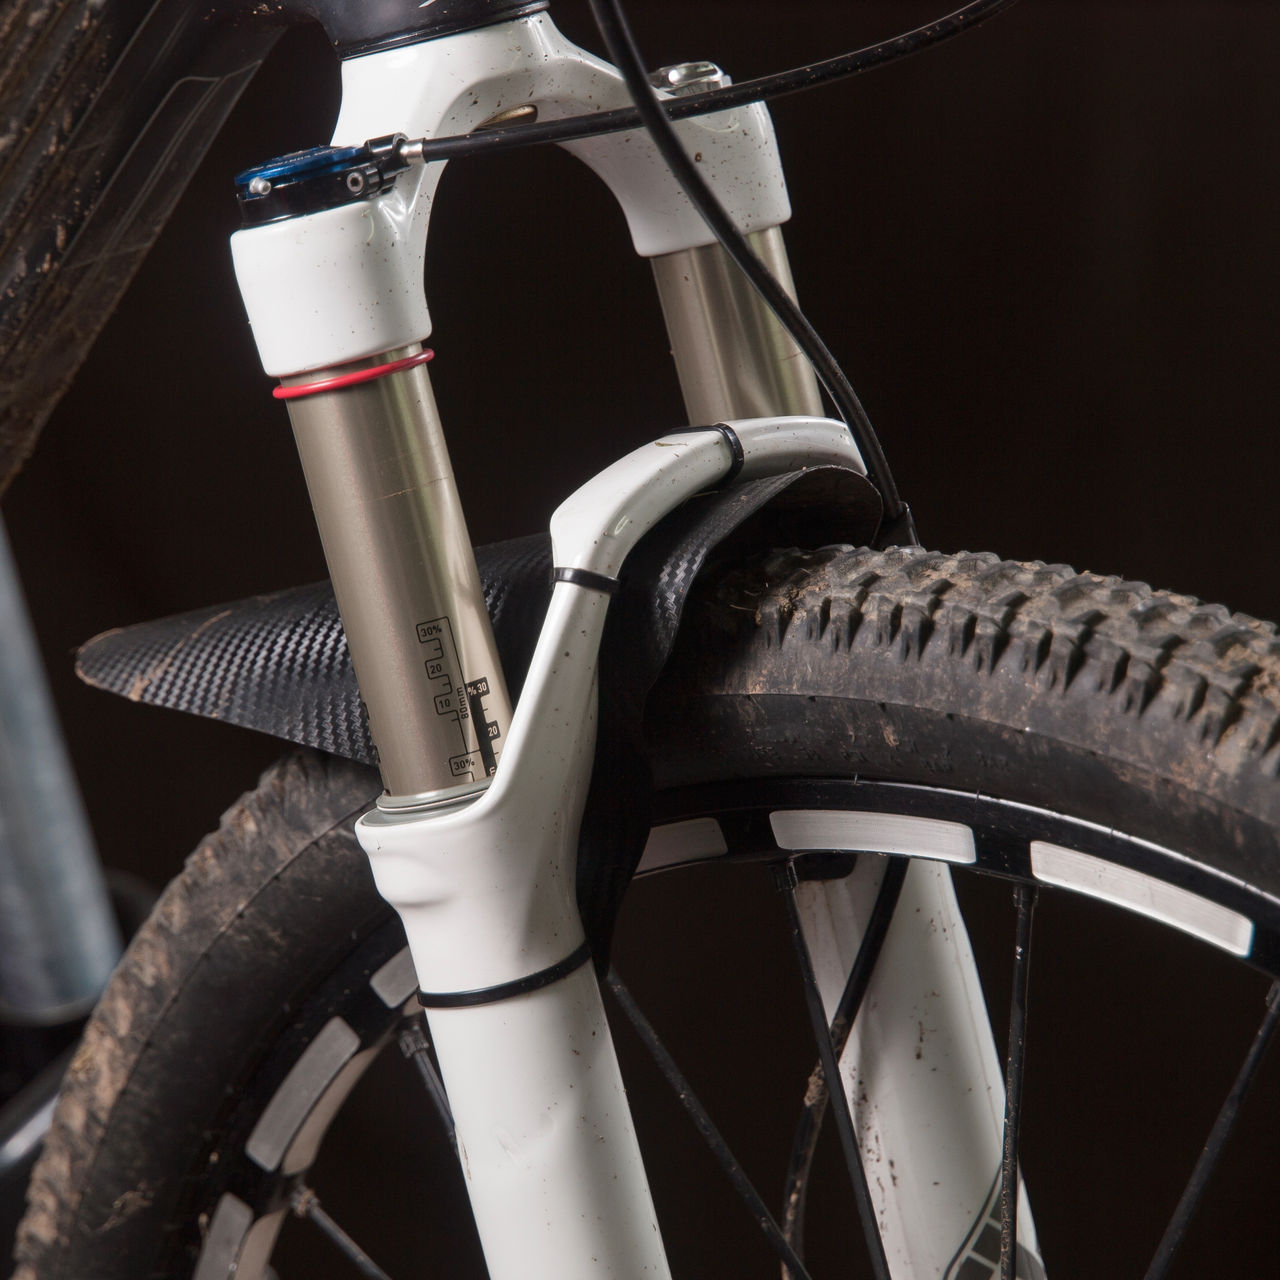
  • Higher-end bikes usually use an air spring. At the top of one of the fork legs there is an aluminum cap hiding a valve. Most rear suspension also uses an air spring. You need a special shock pump to adjust air spring preload. These are small, high-pressure pumps with accurate gauges that securely thread on the valve. Most cost about $30.

  • Bikes with air springs will also have damping adjustments on both front and rear. These are small knobs that control the speed at which your suspension compresses or rebounds.

  • Finally, some suspension will have lockout levers. These won’t completely shut off your suspension, but will stiffen it up for better pedaling efficiency on smooth climbs.

Understanding Sag

Sag is the term for how much your suspension compresses under your resting weight. Consult your bike’s owner’s manual or website for recommended sag, but it is usually 25 to 30% of total travel. Keep in mind, this is just a starting point. As you get to know your bike, there’s nothing wrong with going slightly outside this range.

Most front and rear suspension has a sliding rubber ring on the narrower, inner tube or stanchion, that will help mark how much travel you have used, but you can temporarily wrap a plastic zip-tie around it if not. Get a measuring tape handy, and have someone nearby to help you balance on the bike.

Checking sag will begin the same way, whether measuring front or rear sag. With your helper in front of the bike firmly holding the center of the handlebars, mount the bike and stand out of the saddle with your pedals level and lean forward slightly. To measure your front suspension sag, have your helper slide the rubber ring or plastic tie down the stanchion until it stops.

  1. Gently lean back and dismount, being careful not to compress the fork any further.
  2. Measure the distance the rubber ring or plastic tie has slid, and divide it by the total fork travel if you know it, or the length of the exposed stanchion if you don’t. If that number is below 0.25 or above 0.3, use your shock pump to bleed out or add a small amount of air, or use the thumb screw to loosen or tighten the load on the internal metal spring.

  3. Repeat the process until your results are in that 25-30% range.

To measure rear suspension sag, have your helper slide the rubber ring or plastic tie until it stops against the wider part of the shock body.

  1. Gently lean forward and dismount, being careful not to compress the shock any further.
  2. Measure the distance the rubber ring or plastic tie has moved, and divide it by the shock stroke length (not the same as wheel travel) if you know it, or the length of the exposed stanchion if you don’t. If that number is below 0.25 or above 0.3, either use your shock pump to bleed out or add a small amount of air.

  3. Repeat the process until your results are in that 25-30% range.

Mountain bike suspension detail

Next Up: Damping Adjustment

Forks and shocks may offer rebound damping, compression damping, or both. Consult your owner’s manual to determine which knob is which, and what direction increases or decreases damping.

  • Rebound damping is how quickly your suspension returns. You usually increase rebound damping as you increase preload. Your owner’s manual may suggest a number of “clicks” out from maximum rebound damping for your selected preload pressure. If not, start by feeling the suspension return and finding a rebound setting that isn’t sluggish to return, but doesn’t feel like it is bouncing you back up. Fast rebound is good for successive small impacts like rough gravel, slow rebound is good for big impacts like jumps.
  • Compression damping is best described as “support.” In the front, increased compression damping helps prevent “diving” under aggressive braking force, and in the rear, it helps prevent squatting under aggressive pedaling force. But in each case, it may compromise your suspension’s initial bump sensitivity.

  • High- and low-speed compression and rebound damping is found on advanced suspension. Consult your owner’s manual for tuning tips.

Volume Considerations

Volume is an often forgotten adjustment on air-sprung suspension. Most forks and shocks allow you to insert little plastic parts called volume reducers. Reducing air volume is popular among aggressive riders and makes suspension more “progressive,” absorbing big hits with a softer bottom-out. Increasing air volume is suited for riders looking for a softer ride, and makes suspension more “linear.” It gives up more of its travel more easily, but offers less resistance to bottom-out. All forks and shocks work differently, but those that can accept volume spacers can do so with limited technical knowledge or specialty tools. Consult your owner’s manual.

Suspension Care

After setup, look at those little rubber rings during your first few rides and see if you’re using all your travel. If not, consider lowering your spring preload. If you are, consider increasing your preload. You should bottom your suspension out when you make a mistake, but not all the time. Beyond that, taking care of suspension is pretty simple, and it starts with paying attention to a few things.

  • Avoid damaging or scratching the stanchions. This can damage the parts inside the fork and shock, and can be expensive to repair. Clean any dirt or mud if it builds up around the stanchion, and be careful where you lean or lay down your bike.
  • Keep the original metal valve caps. There’s a lot of pressure inside air springs, and the special metal caps help keep it from leaking.

  • Check your sag once in a while. Air can occasionally leak, and it may happen slowly enough that you won’t notice it

  • Check the moving parts on full-suspension bike frames. In the first few weeks of owning your full-suspension bike, occasionally tighten the bolts holding the frame’s moving linkage members according to the torque specs listed in the owner’s manual. When the bike is new, these pivots often settle in and need some extra attention.

Upgrades and Repairs

Suspension maintenance is more complicated than maintenance to other components on your bike. There are a few things you can do and a few things you should leave to the pros.

  • Things you can do yourself are regular service steps like the ones most suspension brands suggest after every 50 to 200 hours of riding time. Instructions can be found on your suspension manufacturer’s website, usually by searching “service manuals.” Most will require replacement seals and oil, and may require special but relatively affordable tools. These are often $50 to $100 jobs at a shop, so it’s worth trying them yourself.
  • Things you probably can’t do yourself are complicated repairs like malfunctioning dampers or severe oil leaks. These usually require very specialized tools and expertise that even most bike shops leave to the manufacturer or specialty repair shops to handle. If you feel your suspension suddenly compressing or rebounding too quickly, or not at all, or if excessive oil is leaking, especially on the rear shock, take it to a Public Lands location or specialty retailer right away to start the process of getting it fixed.

All articles are for general informational purposes.  Each individual’s needs, preferences, goals and abilities may vary.  Be sure to obtain all appropriate training, expert supervision and/or medical advice before engaging in strenuous or potentially hazardous activity.

MORE STORIES