How To Hike Safely at High Altitudes

Mind these tips when you’re hiking trails and scrambling loose rock at elevations above the treeline.

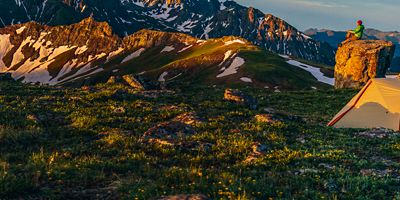
Exploring the wide-open terrain above treeline is one of hiking’s greatest joys. Whether you’re seeking to summit a peak, see alpine wildflowers in full bloom, or simply earn an incredible view, heading into the high mountain elevations brings plentiful rewards. It also carries its own set of risks, including steep terrain, lower oxygen levels, and severe weather. If alpine travel is totally new to you, consider taking a course or hiking with a guide or experienced partners to start. And do your homework, starting with the following essential skills for high-mountain hiking.

In this article, you’ll learn how to:

  • Scramble up steep slopes safely
  • Choose an objective
  • Find your way above treeline
  • Prevent and treat acute mountain sickness (AMS)
  • Avoid lightning
  • Prepare for more technical routes

Scramble Safely

The higher you go, the steeper the terrain tends to get. Mountaineers classify peaks on a Class-1 to Class-5 scale:

Class 1: Straightforward hiking. No need to use your hands. 

Class 2: Hiking with sections of pretty steep terrain. You might use a hand here and there. 

Class 3: Light scrambling. You might carry a rope just in case, but fatal falls are unlikely.

Class 4: Scrambling on exposed terrain where falls could be deadly. Ropes recommended.

Class 5: Technical, vertical climbing with extended no-fall zones. Class 5 climbs are generally rated on a scale from 5.0 to 5.15. Ropes and rock climbing know-how are definitely advised.

Looking to explore into Class-3 or Class-4 territory? Follow this guidance.

  • In alpine terrain, scrambling usually begins when you hit fields of talus (larger rocks) and scree (smaller rocks) nearing the summits of mountains. Don’t rush as you move through these areas. Instead, study the landscape to find the best path to your goal and move carefully along it, revising your plan as the conditions require.
  • Maintain three strong points of contact with the slope at all times (two feet and one hand, or two hands and one foot). Test every rock for stability before you grab or step on it; don’t commit your full weight until you’re sure it won’t move. 
  • Don’t travel directly above or below someone else, in case someone dislodges a rock. 
  • Descending is harder than ascending, and you’re usually tired by the time you start heading down. Be extra careful on the return trip. When the slope is steep, face the rock and downclimb for more stability.
  • Plan your descent route carefully. It’s easy to accidentally get cliffed out, or stuck on a ledge that you can drop down to but not climb back up from. 

Note: Most experts recommend roping up for fourth-class terrain (and even some third-class terrain), especially if you’re new to scrambling or aren’t intimately familiar with the route. Climbing helmets are generally recommended for all routes fourth-class and harder. You should also wear a helmet for any scrambling that takes place in a significant rockfall zone.   

Choose an Objective

When you start shopping around for routes, you may notice that many mountaineering-type objectives come with two ratings: a “climbing class” and a “commitment grade.”

The class rating (see above) is a measure of the hardest climbing you’ll encounter on a route. So, a “Class-4 route” might involve a full mile of fourth-class climbing—or it might just indicate a single fourth-class move. (Always read a detailed route description before committing to a route.) 

The commitment grade (see below) indicates how long an average party takes to complete the technical, or “climby,” part of the route. (This doesn’t include the walk to get to the base of your objective.) Most scrambles are Grade III or lower. 

Grade I: The technical part of the route takes less than half a day

Grade II: The technical section takes a half day

Grade III: The technical section takes most of a day 

Grade IV: The route involves at least a full day of serious technical climbing

Grade V-VII: The route takes multiple days to complete 

If you’re not accustomed to steep, rocky terrain, a “Grade I, Class-3” route is a relatively low-risk place to start. If you have a lot of technical rock climbing experience, you may want to try some fourth-class scrambling, or a longer Class-3 route.

Find Your Way

Official trails often peter out as you hike higher into the alpine zone. The good news is that it’s easy to see the landscape once you’re above treeline, making route-finding a bit simpler. Here’s how to reach your destination—without getting lost.

  • Always travel with a paper map (and perhaps a GPS or navigation app, too) at the ready. Start by finding your location on the map and frequently check your progress.
  • Remember that the shortest line between two locations isn’t always the best route. It’s better to follow a contour line (that is, a line along the same elevation) a longer distance than to get stuck in thick brush or super-steep terrain trying to go a shorter one. Plan your route for the easiest travel, avoiding unnecessary ups and downs. Often, the best route to a summit will gain a ridgeline, follow it to a pass, then head up to the peak.
  • Keep a landmark in sight as you go to help you stay on track. And look out for any cairns. Land managers often place these unnatural stacks of rocks to help indicate the safest/best route.

Avoid Altitude Sickness

Reduced oxygen levels at higher elevations make some people feel sick as they ascend. Acute mountain sickness (AMS) can strike anyone, even people who haven’t had problems on past trips. It feels like a hangover: Fatigue, headache, loss of appetite, insomnia, and nausea are common signs. Here’s how to deal with it.

  • Prevent AMS by gaining altitude slowly (about 1,000 to 2,000 feet per day). Hike higher during the day, then descend lower down the mountain to camp. 
  • Stay hydrated throughout your trip by drinking lots of water and skipping alcohol or too much caffeine. Eating carbohydrates (as opposed to lots of fats or protein) can help, too. 
  • If you frequently get AMS, consider taking a drug such acetazolamide (Diamox) or dexamethasone, both effective at preventing and treating the condition.
  • If you start feeling symptoms, the best cure is descending. Even going down 1,500 feet or so can help. If symptoms don’t subside within 24 hours, head all the way down.
  • Watch for signs of more severe conditions. High-altitude pulmonary edema (HAPE) and high-altitude cerebral edema (HACE) are rare but very serious conditions. Symptoms include extreme fatigue and difficulty breathing (HAPE) and confusion, disorientation, and headache (HACE). Evacuate immediately and seek medical attention. 

Dodge Lighting Strikes

Mountains make their own weather, with afternoon thunderstorms common in many North American mountain ranges. Lightning is one of the most dangerous results for hikers: Being struck can cause death or long-lasting brain injury. Steer clear with these tips.

  • In mountain ranges like the Rockies where afternoon thunderstorms are common, plan to be off exposed summits and above-treeline zones by noon or earlier. This often requires an “alpine start,” or beginning your hike with headlamps in the wee hours of the morning.
  • Hear thunder or spot thunderclouds building? Turn around and get lower on the mountain ASAP. Lightning tends to strike the highest objects in a given area, so you really don’t want to be caught on a summit or in the treeless tundra. 
  • If a storm approaches, get to a safer spot as quickly as you can. Good locations include valleys, depressions, and dense stands of uniform trees. Avoid isolated trees or open meadows.
  • If a lightning storm is on top of you, spread out the people in your group (keep 100 feet between you) so that if you’re struck, it won’t incapacitate everyone. 

Prepare for More Technical Terrain

If you’ve fallen in love with the alpine, you might want to consider leveling-up your skills. This will allow you to tackle bigger peaks and steeper terrain. But before you venture into more fourth- or fifth-class climbing, make sure you have a decent level of hiking experience and good mountain sense. That includes knowledge of local weather patterns, some route-reading experience, and knowledge of risk management techniques in hazardous terrain. If you’re not confident in all those skills, here’s a general progression to help you level up:

  1. Hike rockier trails. First step: Make sure you’re comfortable in scree, talus, boulder fields, and other types of rocky, uneven terrain. 
  2. Ask for local advice. In some mountain regions, afternoon thunderstorms, rockfall, and late-season snow can all add additional hazards. Ask an experienced local climber or mountaineer about rock quality, weather, and other issues to be aware of in your region.

  3. Hit the climbing gym. Technical rock climbing skill helps build fitness and confidence, especially in fourth and fifth-class terrain. Try gym climbing for a few months to build your stamina and body awareness.

  4. Learn to rappel. Rappelling, belaying, and other basic rope skills are essential on many scrambles. If you’re hoping to tackle Class-4 routes—or even more exposed sections of Class 3—it’s worth taking a class or hiring a guide to learn how to manage risk in exposed, low-angle terrain

  5. Find a partner. It’s always advisable to tackle more-committing mountain routes with at least one partner. When you feel confident using your hands on rock, handling exposure, and navigating rocky terrain, find an experienced friend or guide to take on your first alpine climb or technical scramble.

All articles are for general informational purposes.  Each individual’s needs, preferences, goals and abilities may vary.  Be sure to obtain all appropriate training, expert supervision and/or medical advice before engaging in strenuous or potentially hazardous activity.

MORE STORIES